A Pattern Hack for the Jerrie Bucket Bag

If you love the Jerrie Bucket Bag, but would like to make it smaller this hack will let you make it in a mini size!
For this hack will need some narrow bias binding (or cut your own 4cm wide), and hardware of your choice, as well as leather/fabric/interfacing following the original pattern.
You will also need the Jerry Pattern:
The Hack:
- If using Fabric for the outer, by using 1″ hardware you can use the 100% Hidden Connector for Fabric Outer pattern piece (to make it much easier)
- Print the pattern pieces at 70% and assemble the Top Panel, Base, Gusset, Lining and Main Body pattern (and write a note on them that it’s the mini – it’s easy to get them muddled up with the full size pattern!)
- Metric zipper instructions – Cut the zipper tape 48cm long. Cut two zipper tabs, for fabric with folded edges cut 6.5cm x 3.5cm (or width of zipper tape). For raw edges cut 4.5cm x 3.5 (or width of zipper tape). The zipper will be inserted in 1cm (following the same method as the pattern)
- Imperial zipper instructions – cut the zipper tape 19” long. Cut two zipper tabs, for fabric with folded edges cut 2.5” x 1.5” (or the width of zipper tape). For raw edges cut cut 1 3/8” 1.5” (or the width of zipper tape). The zipper will be inserted in 3/8” (following the same method as the pattern
- The seam allowance will be 7cm (1/4″) instead of 10cm (3/8″) throughout, topstitch at what works best for your machine
- To make turning through possible, the base of the lining will be sewn in the same way as the top – with binding. The turning gap is just too small on the mini. If you’re very confident you could do a drop in lining for both.
- Skipping the plastic in the top will make this much easier to sew.
- To make a wrist strap, cut a rectangle 30cm x 10cm (12″ x 4), follow step 1, 2 and 3 on page 6 to fold it to 2.5cm (1″) strap
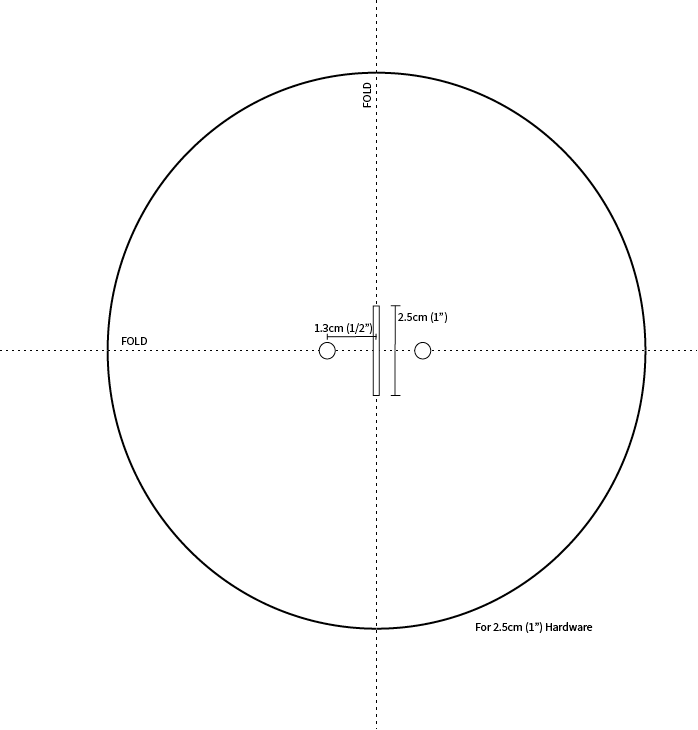
- Rather than two connectors, to make the hack easier to sew, one connector has been added at the centre of the top (or you can pick any other spot).


To find the centre of the top panel, fold it in half, and then into equal quarters. Where the folds meet is the centre. I ruled a 1” long ling, with 1/2” on each side of the fold to make my connector. I then marked a rivet placement 1/2” along the folded line